MySQL Cluster Server Setup
Introduction
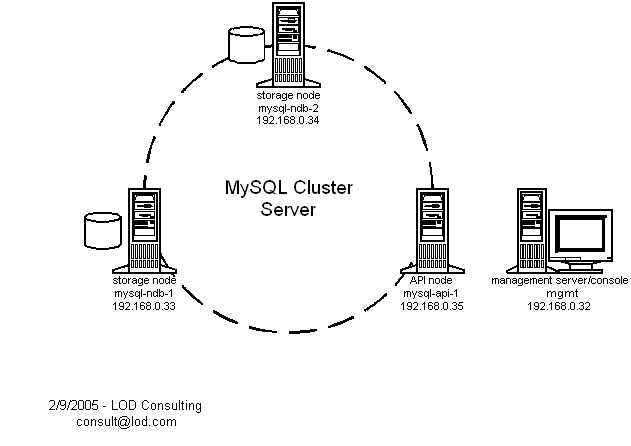
MySQL Cluser Server is a fault-tolerant, redundant, scalable database architecture built on the open-source MySQL application, and capable of delivering 99.999% reliability. In this paper we describe the process we used to setup, configure, and test a three-node mySQL cluster server in a test environment.
Schematic
Hardware
We used four Sun Ultra Enterprise servers in our test environment, but the process for setting up a mySQL cluster server on other UNIX- or Linux-based platforms is very similar, and this setup guide should be applicable with little or no modification.
Our four machines each fall into one of three roles:
- storage nodes (mysql-ndb-1 and mysql-ndb-2)
- API node (mysql-api-1)
- management server and management console (mgmt)
Note that the storage nodes are also API nodes, but the API node is not a storage node. The API node is a full member of the cluster, but it does not store any cluster data, and its state (whether it is up or down) does not affect the integrity or availablility of the data on the storage nodes. It can be thought of as a "client" of the cluster. Applications such as web servers live on the API nodes and communicate with the mySQL server process running locally, on the API node itself, which takes care of fetching data from the storage nodes. The storage nodes are API nodes as well, and technically additional applications could be installed there and communicate with the cluster via the mySQL server processes running on them, but for management and performance reasons this probably should be considered a sub-optimal configuration in a production environment.
Software
Sun Solaris 8 operating system
mysql-max-4.1.9
We used the precompiled binary distribution of mySQL server for Sun SPARC Solaris 8. Obviously, for implementation on other platforms, the appropriate binary distribution should be used. In all cases, the "max" mySQL distribution is required. The mySQL 4.1 download page can be found here.
Procedure
Step One
On both storage nodes, mysql-ndb-1 (192.168.0.33) and mysql-ndb-2 (192.168.0.34), obtain and install mySQL server:
mysql-ndb-1# groupadd mysql
mysql-ndb-1# useradd -g mysql mysql
mysql-ndb-1# cd /usr/local
mysql-ndb-1# wget http://dev.mysql.com/get/Downloads/MySQL-4.1/mysql-max-4.1.9-sun-solaris2.8-sparc.tar.gz/from/http://mysql.he.net/
mysql-ndb-1# gzip -dc mysql-max-4.1.9-sun-solaris2.8-sparc.tar.gz | tar xvf -
mysql-ndb-1# ln -s mysql-max-4.1.9-sun-solaris2.8-sparc mysql
mysql-ndb-1# cd mysql
mysql-ndb-1# scripts/mysql_install_db --user=mysql
mysql-ndb-1# chown -R root  .
mysql-ndb-1# chown -R mysql data
mysql-ndb-1# chgrp -R mysql .
mysql-ndb-1# cp support-files/mysql.server /etc/init.d/mysql.server

mysql-ndb-2# groupadd mysql
mysql-ndb-2# useradd -g mysql mysql
mysql-ndb-2# cd /usr/local
mysql-ndb-2# wget http://dev.mysql.com/get/Downloads/MySQL-4.1/mysql-max-4.1.9-sun-solaris2.8-sparc.tar.gz/from/http://mysql.he.net/
mysql-ndb-2# gzip -dc mysql-max-4.1.9-sun-solaris2.8-sparc.tar.gz | tar xvf -
mysql-ndb-2# ln -s mysql-max-4.1.9-sun-solaris2.8-sparc mysql
mysql-ndb-2# cd mysql
mysql-ndb-2# scripts/mysql_install_db --user=mysql
mysql-ndb-2# chown -R root  .
mysql-ndb-2# chown -R mysql data
mysql-ndb-2# chgrp -R mysql .
mysql-ndb-2# cp support-files/mysql.server /etc/init.d/mysql.server
Do not start the mysql servers yet.
Step Two
Setup the management server and management console on host mgmt (192.168.0.32). This requires only two executables be extracted form the mysql distribution. The rest can be deleted.
mgmt# gzip -dc mysql-max-4.1.9-sun-solaris2.8-sparc.tar.gz | tar xvf -
mgmt# cp mysql-max-4.1.9-sun-solaris2.8-sparc/bin/ndb_mgm /usr/bin
mgmt# cp mysql-max-4.1.9-sun-solaris2.8-sparc/bin/ndb_mgmd /usr/bin
mgmt# rm -r mysql-max-4.1.9-sun-solaris2.8-sparc
mgmt# mkdir /var/lib/mysql-cluster
mgmt# cd /var/lib/mysql-cluster
mgmt# vi config.ini
The file config.ini contains configuration information for the cluster:
[NDBD DEFAULT]
NoOfReplicas=2
[MYSQLD DEFAULT]
[NDB_MGMD DEFAULT]
[TCP DEFAULT]
# Management Server
[NDB_MGMD]
HostName=192.168.0.32           # IP address of this server
# Storage Nodes
[NDBD]
HostName=192.168.0.33           # IP address of storage-node-1
DataDir= /var/lib/mysql-cluster
[NDBD]
HostName=192.168.0.34           # IP address of storage-node-2
DataDir=/var/lib/mysql-cluster
# Setup node IDs for mySQL API-servers (clients of the cluster)
[MYSQLD]
[MYSQLD]
[MYSQLD]
[MYSQLD]
Start the management server and verify that it is running:
mgmt# ndb_mgmd
mgmt# ps -ef | grep [n]db
Step Three
On both storage nodes, mysql-ndb-1 (192.168.0.33) and mysql-ndb-2 (192.168.0.34), configure the mySQL servers:
mysql-ndb-1# vi /etc/my.cnf
mysql-ndb-2# vi /etc/my.cnf
This is the configuration file (/etc/my.cnf) for the mysql server on both storage nodes:
[mysqld]
ndbcluster
ndb-connectstring='host=192.168.0.32'    # IP address of the management server
[mysql_cluster]
ndb-connectstring='host=192.168.0.32'    # IP address of the management server
On both storage nodes, start the NDB storage engine and mysql server and verify that they are running:
mysql-ndb-1# mkdir /var/lib/mysql-cluster
mysql-ndb-1# cd /var/lib/mysql-cluster
mysql-ndb-1# /usr/local/mysql/bin/ndbd --initial
mysql-ndb-1# /etc/init.d/mysql.server start
mysql-ndb-1# ps -ef | grep [n]dbd
mysql-ndb-1# ps -ef | grep [m]ysqld

mysql-ndb-2# mkdir /var/lib/mysql-cluster
mysql-ndb-2# cd /var/lib/mysql-cluster
mysql-ndb-2# /usr/local/mysql/bin/ndbd --initial
mysql-ndb-2# /etc/init.d/mysql.server start
mysql-ndb-2# ps -ef | grep [n]dbd
mysql-ndb-2# ps -ef | grep [m]ysqld
If the mysql server did not startup properly, check the logfile in /usr/local/mysql/data/${HOSTNAME}.err and correct the problem.
Step Four
Start the management console on the management server machine (mgmt) and query the status of the cluster:
mgmt# ndb_mgm
-- NDB Cluster -- Management Client --
ndb_mgm> show
Connected to Management Server at: localhost:1186
Cluster Configuration
---------------------
[ndbd(NDB)]     2 node(s)
id=2    @192.168.0.33  (Version: 4.1.9, starting, Nodegroup: 0, Master)
id=3    @192.168.0.34  (Version: 4.1.9, starting, Nodegroup: 0)

[ndb_mgmd(MGM)] 1 node(s)
id=1    @192.168.0.32  (Version: 4.1.9)

[mysqld(API)]   4 node(s)
id=4 (not connected, accepting connect from any host)
id=5 (not connected, accepting connect from any host)
id=6 (not connected, accepting connect from any host)
id=7 (not connected, accepting connect from any host)
Step Five
Create a test database, populate a table using the NDBCLUSTER engine, and verify correct operation:
On both storage nodes mysql-ndb-1 and mysql-ndb-2 create the test database:
mysql-ndb-1# mysql -u root
Welcome to the MySQL monitor.  Commands end with ; or \g.
Your MySQL connection id is 1 to server version: 4.1.9-max

Type 'help;' or '\h' for help. Type '\c' to clear the buffer.

mysql> create database foo;
Query OK, 1 row affected (0.09 sec)


mysql-ndb-2# mysql -u root
Welcome to the MySQL monitor.  Commands end with ; or \g.
Your MySQL connection id is 6 to server version: 4.1.9-max

Type 'help;' or '\h' for help. Type '\c' to clear the buffer.

mysql> create database foo;
Query OK, 1 row affected (0.13 sec)
Back on storage node mysql-ndb-1, populate the database with a table containing some simple data:
mysql-ndb-1# mysql -u root
Welcome to the MySQL monitor.  Commands end with ; or \g.
Your MySQL connection id is 1 to server version: 4.1.9-max

Type 'help;' or '\h' for help. Type '\c' to clear the buffer.

mysql> create database foo;
Query OK, 1 row affected (0.09 sec)

mysql> use foo;
Database changed
mysql> create table test1 (i int) engine=ndbcluster;
Query OK, 0 rows affected (0.94 sec)

mysql> insert into test1 () values (1);
Query OK, 1 row affected (0.02 sec)

mysql> select * from test1;
+------+
| i    |
+------+
|    1 |
+------+
1 row in set (0.01 sec)
Now go to storage node mysql-ndb-2 and verify that the data is accessible:
mysql-ndb-2# mysql -u root
Welcome to the MySQL monitor.  Commands end with ; or \g.
Your MySQL connection id is 7 to server version: 4.1.9-max

Type 'help;' or '\h' for help. Type '\c' to clear the buffer.

mysql> use foo;
Reading table information for completion of table and column names
You can turn off this feature to get a quicker startup with -A

Database changed
mysql> select * from test1;
+------+
| i    |
+------+
|    1 |
+------+
1 row in set (0.00 sec)
This is a good sign, but note that it does not actually prove that the data is being replicated. The storage node (mysql-ndb-2) is also a cluster API node, and this test merely shows that it is able to retrieve data from the cluster. It demonstrates nothing with respect to the underlying storage mechanism in the cluster. This can be more clearly demonstrated with the following test.
Kill off the NDB engine process (ndbd) on one of the storage nodes (mysql-ndb-2) in order to simulate failure of the storage engine:
mysql-ndb-2# ps -ef | grep [n]db
    root  3035  3034  0 17:28:41 ?        0:23 /usr/local/mysql/bin/ndbd --initial
    root  3034     1  0 17:28:41 ?        0:00 /usr/local/mysql/bin/ndbd --initial
mysql-ndb-2# kill -TERM 3034 3035
mysql-ndb-2# ps -ef | grep [n]db
The management server will recognize that the storage engine on mysql-ndb-2 (192.168.0.34) has failed, but his API connection is still active:
ndb_mgm> show
Cluster Configuration
---------------------
[ndbd(NDB)]     2 node(s)
id=2    @192.168.0.33  (Version: 4.1.9, Nodegroup: 0)
id=3 (not connected, accepting connect from 192.168.0.34)

[ndb_mgmd(MGM)] 1 node(s)
id=1    @192.168.0.32  (Version: 4.1.9)

[mysqld(API)]   4 node(s)
id=4    @192.168.0.33  (Version: 4.1.9)
id=5    @192.168.0.34  (Version: 4.1.9)
id=6 (not connected, accepting connect from any host)
id=7 (not connected, accepting connect from any host)
On the first storage node (mysql-ndb-1) populate another new table with some test data:
mysql-ndb-1# mysql -u root
Welcome to the MySQL monitor.  Commands end with ; or \g.
Your MySQL connection id is 4 to server version: 4.1.9-max

Type 'help;' or '\h' for help. Type '\c' to clear the buffer.

mysql> use foo;
Reading table information for completion of table and column names
You can turn off this feature to get a quicker startup with -A

Database changed
mysql> create table test2 (i int) engine=ndbcluster;
Query OK, 0 rows affected (1.00 sec)

mysql> insert into test2 () values (2);
Query OK, 1 row affected (0.01 sec)

mysql> select * from test2;
+------+
| i    |
+------+
|    2 |
+------+
1 row in set (0.01 sec)
Back on the second storage node (mysql-ndb-2) perform the same select command:
mysql-ndb-2# mysql -u root
Welcome to the MySQL monitor.  Commands end with ; or \g.
Your MySQL connection id is 9 to server version: 4.1.9-max

Type 'help;' or '\h' for help. Type '\c' to clear the buffer.

mysql> use foo;
Reading table information for completion of table and column names
You can turn off this feature to get a quicker startup with -A

Database changed
mysql> select * from test2;
+------+
| i    |
+------+
|    2 |
+------+
1 row in set (0.01 sec)
The storage engine and the API server are two separate, distinct processes that are not inherently dependent on one another. Once the ndbd storage engine process is restarted on the second storage node, the data is replicated, as the following test demonstrates.
First, restart the storage engine process on mysql-ndb-2:
mysql-ndb-2# /usr/local/mysql/bin/ndbd
Next, shutdown the storage engine on mysql-ndb-1 either using the management console or command line kill:
mgmt# ndb_mgm
ndb_mgm> show
Cluster Configuration
---------------------
[ndbd(NDB)]     2 node(s)
id=2    @192.168.0.33  (Version: 4.1.9, Nodegroup: 0, Master)
id=3    @192.168.0.34  (Version: 4.1.9, Nodegroup: 0)

[ndb_mgmd(MGM)] 1 node(s)
id=1    @192.168.0.32  (Version: 4.1.9)

[mysqld(API)]   4 node(s)
id=4    @192.168.0.33  (Version: 4.1.9)
id=5    @192.168.0.34  (Version: 4.1.9)
id=6 (not connected, accepting connect from any host)
id=7 (not connected, accepting connect from any host)

ndb_mgm> 2 stop
Node 2 has shutdown.
Now, to determine if the SQL data was replicated when the storage engine on mysql-ndb-2 was restarted, try the query on either (or both) hosts:
mysql-ndb-1# mysql -u root
Welcome to the MySQL monitor.  Commands end with ; or \g.
Your MySQL connection id is 5 to server version: 4.1.9-max

Type 'help;' or '\h' for help. Type '\c' to clear the buffer.

mysql> use foo;
Reading table information for completion of table and column names
You can turn off this feature to get a quicker startup with -A

Database changed
mysql> select * from test2;
+------+
| i    |
+------+
|    2 |
+------+
1 row in set (0.01 sec)


mysql-ndb-2# mysql -u root
Welcome to the MySQL monitor.  Commands end with ; or \g.
Your MySQL connection id is 10 to server version: 4.1.9-max

Type 'help;' or '\h' for help. Type '\c' to clear the buffer.

mysql> use foo;
Reading table information for completion of table and column names
You can turn off this feature to get a quicker startup with -A

Database changed
mysql> select * from test2;
+------+
| i    |
+------+
|    2 |
+------+
1 row in set (0.01 sec)
This shows that the data is being replicated on both storage nodes. Restart the storage engine on mysql-ndb-1:
mysql-ndb-1# /usr/local/mysql/bin/ndbd
Step Six
Next, we add a cluster API node. This node is a full member of the cluster, but does not run the NDB storage engine. Data is not replicated on this node, and it functions essentially as a "client" of the cluster server. Typically, we would install applications that require access to the mySQL data (web servers, etc) on this machine. The applications talk to the mySQL server on localhost, which then handles the underlying communication with the cluster in order to fetch the requested data.
First, install the mysql server on the API node mysql-api-1 (192.168.0.35):
mysql-api-1# groupadd mysql
mysql-api-1# useradd -g mysql mysql
mysql-api-1# cd /usr/local
mysql-api-1# wget http://dev.mysql.com/get/Downloads/MySQL-4.1/mysql-max-4.1.9-sun-solaris2.8-sparc.tar.gz/from/http://mysql.he.net/
mysql-api-1# gzip -dc mysql-max-4.1.9-sun-solaris2.8-sparc.tar.gz | tar xvf -
mysql-api-1# ln -s mysql-max-4.1.9-sun-solaris2.8-sparc mysql
mysql-api-1# cd mysql
mysql-api-1# scripts/mysql_install_db --user=mysql
mysql-api-1# chown -R root  .
mysql-api-1# chown -R mysql data
mysql-api-1# chgrp -R mysql .
mysql-api-1# cp support-files/mysql.server /etc/init.d/mysql.server
Install a simple /etc/my.cnf file:
[mysqld]
ndbcluster
ndb-connectstring='host=192.168.0.32'    # IP address of the management server
[mysql_cluster]
ndb-connectstring='host=192.168.0.32'    # IP address of the management server
Now start the mySQL server:
mysql-api-1# /etc/init.d/mysql.server start
Perform some test queries on the database tables we created earlier:
mysql-api-1# mysql -u root
Welcome to the MySQL monitor.  Commands end with ; or \g.
Your MySQL connection id is 1 to server version: 4.1.9-max

Type 'help;' or '\h' for help. Type '\c' to clear the buffer.

mysql> create database foo;
Query OK, 1 row affected (0.11 sec)

mysql> use foo;
Reading table information for completion of table and column names
You can turn off this feature to get a quicker startup with -A

Database changed
mysql> select * from test1;
+------+
| i    |
+------+
|    1 |
+------+
1 row in set (0.01 sec)

mysql> select * from test2;
+------+
| i    |
+------+
|    2 |
+------+
1 row in set (0.01 sec)
At this point you can check the cluster status on the management console and verify that the API node is now connected:
ndb_mgm> show
Cluster Configuration
---------------------
[ndbd(NDB)]     2 node(s)
id=2    @192.168.0.33  (Version: 4.1.9, Nodegroup: 0)
id=3    @192.168.0.34  (Version: 4.1.9, Nodegroup: 0, Master)

[ndb_mgmd(MGM)] 1 node(s)
id=1    @192.168.0.32  (Version: 4.1.9)

[mysqld(API)]   4 node(s)
id=4   (Version: 4.1.9)
id=5   (Version: 4.1.9)
id=6    @192.168.0.35  (Version: 4.1.9)
id=7 (not connected, accepting connect from any host)
Our configuration now resembles the diagram at the top of the page.
Step Seven
Finally, we should verify the fault-tolerance of the cluster when servicing queries from the API node.
With the cluster up and operating corrrectly, use the API node to create a new table and insert some test data:
mysql-api-1# mysql -u root
Welcome to the MySQL monitor.  Commands end with ; or \g.
Your MySQL connection id is 258519 to server version: 4.1.9-max

Type 'help;' or '\h' for help. Type '\c' to clear the buffer.

mysql> use foo;
Reading table information for completion of table and column names
You can turn off this feature to get a quicker startup with -A

Database changed
mysql> create table test3 (i int) engine=ndbcluster;
Query OK, 0 rows affected (0.81 sec)

mysql> quit
Bye
Now, insert some random data into the table, either by hand or you can use a quick script to do it:
#!/bin/sh
for i in 1 2 3 4 5 6 7 8 9 10
do
        random=`perl -e "print int(rand(100));"`
        echo "use foo; insert into test3 () values ($random);" | mysql -u root
done
Try a test query on the API node:
mysql-api-1# mysql -u root
Welcome to the MySQL monitor.  Commands end with ; or \g.
Your MySQL connection id is 258551 to server version: 4.1.9-max

Type 'help;' or '\h' for help. Type '\c' to clear the buffer.

mysql> use foo;
Reading table information for completion of table and column names
You can turn off this feature to get a quicker startup with -A

Database changed
mysql> select * from test3;
+------+
| i    |
+------+
|   92 |
|   20 |
|   18 |
|   84 |
|   49 |
|   22 |
|   54 |
|   91 |
|   79 |
|   52 |
+------+
10 rows in set (0.02 sec)
Looks good. Now, disconnect the network cable from the first storage node so that it falls out of the cluster. Within a few seconds, the management console will recognize that it has disappeared:
ndb_mgm> show
Cluster Configuration
---------------------
[ndbd(NDB)]     2 node(s)
id=2 (not connected, accepting connect from 192.168.0.33)
id=3    @192.168.0.34  (Version: 4.1.9, Nodegroup: 0)

[ndb_mgmd(MGM)] 1 node(s)
id=1    @192.168.0.32  (Version: 4.1.9)

[mysqld(API)]   4 node(s)
id=4 (not connected, accepting connect from any host)
id=5   (Version: 4.1.9)
id=6    @192.168.0.35  (Version: 4.1.9)
id=7 (not connected, accepting connect from any host)
Is the cluster data still available to the API node?
mysql-api-1# mysql -u root
Welcome to the MySQL monitor.  Commands end with ; or \g.
Your MySQL connection id is 258552 to server version: 4.1.9-max

Type 'help;' or '\h' for help. Type '\c' to clear the buffer.

mysql> use foo;
Reading table information for completion of table and column names
You can turn off this feature to get a quicker startup with -A

Database changed
mysql> select * from test3;
+------+
| i    |
+------+
|   54 |
|   91 |
|   79 |
|   52 |
|   92 |
|   20 |
|   18 |
|   84 |
|   49 |
|   22 |
+------+
10 rows in set (0.02 sec)
Now, plug the disconnected storage node back into the network. It will attempt to rejoin the cluster, but probably will be shutdown by the management server, and something similar to the following will appear in the error log (/var/lib/mysql-cluster/mdb_2_error.log):
Date/Time: Saturday 12 February 2005 - 12:46:21
Type of error: error
Message: Arbitrator shutdown
Fault ID: 2305
Problem data: Arbitrator decided to shutdown this node
Object of reference: QMGR (Line: 3796) 0x0000000a
ProgramName: /usr/local/mysql/bin/ndbd
ProcessID: 1185
TraceFile: /var/lib/mysql-cluster/ndb_2_trace.log.3
***EOM***
Restart the ndb storage engine process on that node and verify that it rejoins the cluster properly:
mysql-ndb-1# /usr/local/mysql/bin/ndbd


ndb_mgm> show
Cluster Configuration
---------------------
[ndbd(NDB)]     2 node(s)
id=2    @192.168.0.33  (Version: 4.1.9, Nodegroup: 0)
id=3    @192.168.0.34  (Version: 4.1.9, Nodegroup: 0, Master)

[ndb_mgmd(MGM)] 1 node(s)
id=1    @192.168.0.32  (Version: 4.1.9)

[mysqld(API)]   4 node(s)
id=4   (Version: 4.1.9)
id=5   (Version: 4.1.9)
id=6    @192.168.0.35  (Version: 4.1.9)
id=7 (not connected, accepting connect from any host)
Miscellaneous
Remember that in order for SQL data to be stored (replicated) on the cluster, database tables must be created specifying engine=NDBCLUSTER (as shown the in the examples above). It is possible to use this mechanism to specify different storage engines for different tables within the same database, depending on individual performance and reliability requirements. Non-critical database tables need not be stored on the cluster.
It is possible to make NDBCLUSTER the default storage engine by adding a line to the /etc/my.cnf configuration file:
[mysqld]
default-table-type=NDBCLUSTER
Occasionally, after abnormal cluster node termination (for example, a system crash) we see "hung" connections, and upon restart the failed node is unable to join the cluster. In this case, the session should be manually cleared on the management console using the command, "purge stale sessions":
ndb_mgm> purge stale sessions
Purged sessions with node id's: 3
ndb_mgm>
Please direct questions, comments, and suggestions regarding this document to consult@lod.com